Wednesday, December 30, 2020

Reflecting on The Year


Reflecting on The Year.....

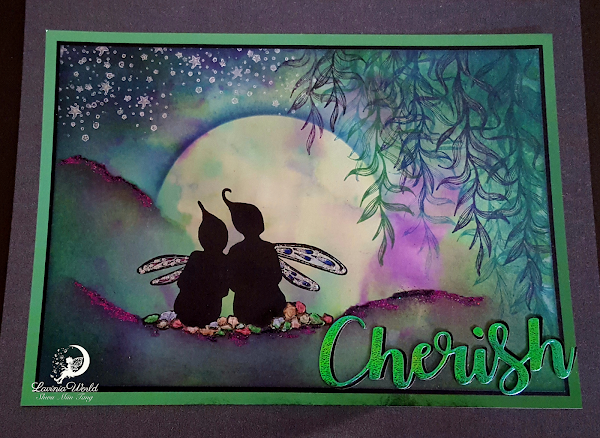
Ringing in the New Year is usually a festive affair, with parties, celebrations, fireworks...lots of fun activities!  The year 2020 has been so different, so challenging to so many.....sometimes it's good to just spend a quite evening with loved ones, counting the blessings we've overlooked or taken for granted.  It is with this in mind that this scene is created for the current LW bi-weekly challenge.  Who would you choose to spend the last evening of the year with?

Lavinia Stamps used:
Stargazing Couple
Marine Kelp
Mini Stars

The sentiment is a word die from Crafter's Companion.  The background is once again created from Tracey's gel press technique.
I quite like the colorful array of liquid pearls on the pebbles the couple is sitting on.  Also enjoyed putting black and purple glitters to accentuate the hills.

Thanks for stopping by.  Have a Wonderful New Year!!

Wednesday, December 16, 2020

2020 Christmas party


2020 Christmas Party

What are your Christmas plans this year!  Giselle is all decked out for her party.  Are you ready for yours?

When I first created this scene, I hadn't planned on making it a Christmas one.  But Giselle's beautiful dress and the beautiful red background ultimately made that decision for me! 😋

For this gel press background, I think I used all the lighter colors I have in the middle including lemon yellow, yellow ochre, orang, and burnt orange.  Then going outward I sprinkled crimson and merlot with a couple splashes of green mixed in.  

Lavinia stamps used:

Giselle
Mushroom lantern
Wild flower
Creepy vine

To me the star of this scene, other than the beautiful Giselle, is the way the gorgeous organic background draws in your attention.  Hope you enjoy it as much as I do.

This is my DT project for LW challenge #42.  Thanks for stopping by. Have a beautiful day!
 

Wednesday, December 2, 2020

PEACE UNTO YOU


 PEACE UNTO YOU

December is upon us.  'Tis the time to get ready to celebrate the most magical season of the year!  May all your preparations for the Holidays be festive and joyous!

This time last year I had not yet discovered Lavinia Stamps but I already own this particular crafter's companion embossing folder which helped to create a fabulous forest scene.  I started off by embossing a 5 x 7 piece of white cardstock in this folder ( I apologize for the less than clear picture):


I sponged different green color inks (including Forest Green distress oxide, Rainforest and Green Oasis versafine claire) onto the trees which gave this scene a beautiful depth.

The only Lavinia stamp I used was the mini castle which when placed in the top middle of this scene, gave this card even more depth.

I found some deer dies from my stash which made a lovely addition to the bottom of this card.

This is DT project for LW challenge #41.  Thanks for stopping by.  Have a wonderful day!


Thursday, November 19, 2020

Grateful for friends like you!


Grateful For Friends Like You


Oona is checking up on her friend 'Moments like these' fairy.  For this Thanksgiving, let's not forget all those who always take the time to check on their friends!

Lavinia Stamps Used:
Moments like These Fairy
Oona
Mini  Branch
Mini Winter Berry 
Mini Berries
Mini Leaf 2
Spotty Toadstool

The background paper was made with the usual oxide ink on gel plate sprinkled with colorburst crystals.  The marbled paper used to mat the project was done using Easy Marble by Marabu.  Here's a picture of the other half of the marbled paper I used for matting:


Several different types of glitters on the moon and the wings were used including the pearl translucent glitter powder from Fairy Hugs.  It's currently my favorite go-to glitter.

This is the DT project for LW challenge #40.  Please join us for a chance to win a gift at our challenge blog or our Facebook group Anything Lavinia!  Thanks for stopping by!


Thursday, November 12, 2020

Celeste In The Midst of Snow Flurries

Celeste in the Midst of Snow FlurriesI created this background using Tracey's gel press system.  This will be my first attempt at a photo tutorial.  Quite frankly, Tracey's Youtube tutorials on this technique are excellent.  I try to copy her as much as I can, with maybe one or two small twists.

First of all, I do not own any brushos, but I find that Ken Oliver's colorburst crystals work just as well.  Here are some of the colors I have:  Lemon Yellow, Yellow Ochre, Burnt Orange, Crimson Red, Merlot, Sepia, Lime Green, Spring Green, Teal, Terre Verte, Blue, Violet, Orchid, and Indigo.


After mixing a small amount (less than the size of a green pea) of these crystals and lots of water, I'm ready to begin:


You can use any smooth cardstock, but I find multifarious cards to be the best for these backgrounds.  X-Press it blending cards come close. It has a better price point but is not as thick.  For this example I used the multifarious card.

I selected Wilted Violet distress oxide as my base layer and brayered it onto a 5 x 7 gel press:


I mixed some pearl mica powder with water in a little sprayer and sprayed onto the middle of the gel press.


Using a fan brush, I flicked some yellow ochre onto the center of the gel press.


Next I flicked some crimson red and teal going outward towards the edges and 2 corners.


I sprinkled some violet on the other 2 corners.


Finally I sprinkled some Indigo around all the edges.


Now it's time to place the multifarious card on top of the gel press and see what kind of print we get.   A word of caution:  do not wait too long to pull the paper from the gel press, you won't get any movement because it'll be too dried.  I counted to 5 while smoothing over the cardstock over the gel press and pulled it right after counting to 5.   And you can pull from top to bottome, left to right, or one corner to the opposite corner.  Experiment!!   

And this is what I got.


After it's dried, I cut it to size and it's ready to be stamped on.


I decided to stamp Celeste in the middle and have different snow flakes with different colors and generational stampings all around this beautiful fairy.  I heat embossed some snowflakes with white, pink, and sparkly snow embossing powders.  I darkened the edges with blue bell and Fantasia Verssaclair inks and this project is done!


Thanks for stopping by!  Have fun creating your unique gel press background!!


Wednesday, November 4, 2020

The Purple Stag


The Purple Stag

Some of us need to prepare for the harsh winter months.   Not for this beautiful purple stag in the magical fantasy land, where everything is either blue, green, or purple year round.

Lavinia Stamps used:
Stag
Vine Flourish

Border die used:
Crafters Companion Gemini Sentiment Dies

I created a scene with the stag in the middle using paper from Lavinia Dreamscapes:


It always makes me happy when I can incorporate dies in my Lavinia projects.  I was really glad that the Lavinia Stag would fit nicely in the center of this particular die.  I had to diecut it several times to get the dimension I wanted.  The top layer was cut from a very pretty ombre looking mirror cardstock from Hunkydory:


After I glued the border onto the background scene, the purple stag looks very regal and happy!


  This is the DT project for Lavinia World challenge #39.  Thank you for stopping by!  Hope to see your creation in one of our challenges soon!

Thursday, October 22, 2020

Spooky Castle on Halloween

Spooky Castle on Halloween

What's more spooky than dragons, bats and eerie looking castle on Halloween?   Well, since I'm not big on Halloween and don't have any witch or goblin stamps, these will have to suffice--but I really tried to make it as scary as possible....maybe not too successfully! 😁

Lavinia Stamps used:
Dragon Stone Castle
Mideela (sm)
Dragon Pods

Aside from making the hills darker by applying versafine claire nocturne to the top edges, and making the dragon pods more hairy and scary looking by adding thick black strokes with prismacolor pencil, I really didn't do much else.  Didn't even add any glitters to this project. But I still had loads of fun with this scene and maybe this time next year I would've acquired more Halloweenish stamps!

This is my DT project for Lavinia World challenge#38.  Check out our challenge blog or enter your creation on our AL Facebook page.  Thanks for stopping by!  Have a blessed day!

Wednesday, October 7, 2020

Sky the Musician


Sky the Musician


Sky is such a happy fairy.  You can almost hear the happy music she's playing!  This project is the result of my trying to set her up in a background made with newly acquired music note stencil and paper.


Lavinia Stamps used:

Sky    

Creepy Vine

Berry Leaves

Mini Leaves


The Music note stencil is from Paper Discovery and the Music printed paper used to mat the project is from Paper Wishes.


I originally thought using the music stencil would be a piece of cake and would go very well with the scene.  But I didn't like the color I chose, then added glitter pen on top which made it worse.  I then attempted to cover it up with antique linen distress oxide.  The final result of stenciling gives a very faint hint of music notes and signs around Sky....I chalk it up as a good save😅


I had created a similar scene with Sky earlier and loved it so much that I decided to make another one so I can send one of them to a friend when needed.  

This DT project is for Lavinia World Challenge #36.  Won't you join us at our blog or our Face book page Anything Lavinia!

Thanks for stopping, and as always, happy crafting!


Wednesday, September 23, 2020

Dandelions and Fairytale


 Dandelions and Fairytale

Looking through my stash of dies, I came across a brand new, never opened cut and emboss folder with beautiful dandelions.  My mind is immediately set on choosing the 'Fairytale' fairy as my focal image for this DT project for LW challenge #36.

Lavinia stamp featured:
Fairytale
Fairydust verse....

Cut and emboss folder featured:
Crafter's Companion 'Fairy Garden' set

I started out with a piece of pale yellow cardstock cut to 5 x 7.  After putting it in the cut and emboss folder and ran it through a die cutting machine, the resulting frame looked like this:


Because I didn't like the top lefthand corner of the frame, I cut it out and left the frame open.  Then I used different distress oxide inks (mainly orange/red and green shades) to color the frame. 

I chose a background from a batch previously made with gel press, brayer, distress oxides, and color crystals and stamped Fairytale with Versafine Claire Nocturne ink.  Spectrum Noire's crystal clear sparkle ink was applied to Fairytale's wings.

I used foam squares and glued the dandelion frame onto the Fairytale background.  White gel pen was used to close the dandelion frame.  At  one point I was quite disappointed that the the colors of the frame and the main background didn't really complement each other nicely.  But after looking at them more closely, I found it quite entertaining trying to find the similarities between the two! 😄

Thank you for stopping by.  Don't forget to visit LW blogpost or AL Face group and enter your creations for a chance to win a Gift card to the Lavinia World store.  Happy crafting!!

Saturday, September 5, 2020


An Aquarium View of Tropical Fish

The latest release of mermaid/underwater Lavinia stamps has taken my imagination seaward for a while now.  I'm happy to bring to life an aquarium view of these sea creatures.  These wonderful stamps are giving my colored pencils a new lease on life.  Coloring has become fun again!


Lavinia stamps used:

Fish set

Sea Urchins

Seaweed 2


I used 'pond pebble' cut and emboss folder from Paper Discovery for the frame.  The central image and the pebble frame were from the same sheet of background paper I created from distress oxide and color crystals.  I used more distress oxide (mohageny red, walnut stain, and black soot) on the border, then sprayed it with pearl mica powder solution, then darkened the outer border with Rainforest Versafine claire ink.  I quite like the overall effect of the pebble frame.


This is the DT project for the bi-weekly Lavinia World challenge #35 starting on September 10.  Won't you join us at our blog!


Thanks for stopping by. 


Monday, August 24, 2020

Dome Shaped Fairy Card


Dome shaped Fairy card

I love die cutting beautiful shapes and have collected so many different types of metal dies over the years.  But since discovering Lavinia Stamps a few months ago, my dies have been collecting dust in a corner (albeit a big corner).  So I was so delighted to be able to use both in my project for Lavinia World challenge #34.

The Lavinia Stamps featured:
Fairy Dust Silhouette
Lunar Buds
Berry Leaves
Mini Stars

Metal Die featured:
Fairy Dust from Crafters Companion Enchanted Forest Set

I used different shades of blue distress oxide inks, plus squeezed lemon and spice marmalade to create the background. Versa Fine Claire Nocturne ink was used to stamp the images on the background.


The card base is 5 x 7.  I cut a piece of acetate to 5 x 9 and scored it half an inch from each side to create folds to glue to the card base.  The fairy diecut was glued to the center of the acetate along with some border stickers:


When it is all assembled, the acetate creates a nice dome over the card base.  I thought the two fairies look rather nicely together.  Here's another look at the card under a different lighting:


Please join us on Lavinia World challenge blog or Anything Lavinia facebook page for challenge #34 from August 27 to September 7.

Thank you for stopping by!  Stay safe and continue to have fun crafting!

Wednesday, August 12, 2020

Hanging Art with Lavinia Scenes


Hanging Art with Lavinia Scenes

During my quiet time one morning, I was inspired to do these pieces to help me remember scripture verses.  These scenes were originally intended for inside of cards, but then I thought they would be perfect for these hanging ornaments where I can be reminded of God's presence whenever I see them around the house or when I drive! 


Various Lavinia Stamps were used including:
Sea Creatures
Whimsical Hare and Pipin
Mushroom Lanterns
Meadow Mushrooms
Fairy Foragers
Fairy Pods
Mini Snail

Versa fine Claire ink pads used:
Nocturne
Monarch
Blue Bell
Rain Forest
Twilight

Distress Oxide Inks and Colourburst Crystals were used to create the backgrounds along with gel plates and brayer.

These scenes were backed with diecut pieces using dies from my stash from these companies:
Anna Griffin
Spellbinder's
Paperwishes

This project is for Lavinia World Challenge #33.  Won't you join us at https://laviniaworldchallenges.blogspot.com

Thanks for stopping by.  Have a blessed day!


Wednesday, July 29, 2020

Sweet Rendezvoux At the Fairy Bridge


6/11/20

SWEET RENDEZVOUX AT THE FAIRY BRIDGE


This sweet Lavinia scene brings back memories of first dates!  The fairy bridge is the perfect spot to meet under the lovely moonlight.  

The stamps used:  Fairy Door, Roray and Darcy, Creepy Vine, and the Fairy Bridge.

The versa fine claire ink pads used: Nocturne, Monarch, Rain Forest, and Blue Belle.

The background was created from Distress Oxide and Colorburst Crystals.  Still trying to improve on this technique.  I'm waiting for the day I can produce backgrounds similar to the ones Tracey did on her Youtube tutorials!!

A little touch up of color on both trees was done with brown colored pencils.  The tree on the right was stamped using the creeping vine stamp vertically.  It was quite fun using the stamp this way!  😀

I drew more rocks extending out from the bridge.  Hopefully this doesn't take away too much from the focal point of this scene--two cuties meeting at the fairy bridge!!

Let me also share a photo of this project after I added even more glitters:


This project is for Lavinia World bi-weekly challenge #32.  Won't you join us on https://laviniaworldchallenges.blogspot.com  or at our facebook page https://www.facebook.com/groups/AnythingLavinia 

Thanks for stopping by.  Have a great day and keep on crafting!


Wednesday, July 15, 2020

The Tree Goddess Overlooking the Beauty of Her Kingdom


The Tree Goddess Overlooking the Beauty of Her Kingdom


This is a project for Lavinia World challenge #31.  It is done with the intention of sharing how easily and quickly a beautiful scene can be created using SceneScapes papers from Lavinia Stamps.  

This project took me no more than 15 minutes to finish.  Here is a list of items used:

    SceneScapes paper titled "Magic"

    Lavinia Stamps:  Luna the Tree Goddess, 

                                Dragon Pods,

                                Creeping Vine

    Versa fine claire ink pads used: Nocturne

                                                       Monarch

                                                       Blue Belle

The most time consuming part of this project was drawing and coloring the extended tree branch Luna is sitting on because I wanted her to be more in the center of the picture. 

Even though this is a simple card to make, but out of all my 70+ Lavinia projects I've done so far, this one is my mom's favorite because of the colors.  I also love how you can darken the border and accentuate the moon with more ink on this wonderful SceneScapes paper.

I used gel pens and colored pencils to color the dragon pods and the fairy wings.  Glitters were added later to further embellish them.  Here is another look of the scene with more sparkles:


Can you tell I am now in love with glitters?  This is coming from someone who has never used glitters until only a few weeks ago!  

Anyways, thank you for stopping by.  Have fun crafting........

Monday, June 29, 2020

Spreading the Magic Fairy Dust


Spreading The Magic Fairy Dust

In the fantasy fairy land, fairy dust is a special commodity which spreads cheer, hope, joy, love, and magic to those who believe.  What fantastic job it is to spread such magical fairy dust to all who need it!


Lavinia Stamps used:  Fairy Dust Silhouette,

                                    Fairy Buds, 

                                    Berry Leaves, and 

                                    Stars miniature.

The large flower where Fairy Dust is sitting on is from a line flower stamp I have in my stash.  I colored it with glitter pens and colored pencils, then sprinkled some glitters on the end of each petal.


The background is from distress oxide and colorburst crystals.  I was real tempted to put a moon behind Fairy Dust but then decided to let the magical light shine freely on this beautiful fairy, and envelope her in its warmth.


I used a border die from 'card making magic' to cut away a pattern out of a square silver linen cardstock and backed it with black cardstock to give this 6 x 6 card a fancy frame.


I added more glitter to this project later (on the fairy wings and the flower petals) and would like to share a picture here to show the difference a little more sparkle can add to a scene:


This is a project for Lavinia World Challenge #30.  Thank you for stopping by.  I hope you have lots of time to craft and enjoy the process of creating your next masterpiece!

Thursday, June 18, 2020

Castle in the Sky

Dragon castle in the sky


This is my DT project for Lavinia World challenge #29.  The castle on the clouds seems uninhabited and vulnerable, but the presence of dragons keeps it protected and  alive!

The Lavinia Stamps used : Dragon Stone Castle, mini dragon,  small mideela,  and fairy pods.
The border die used is from Card Making Magic.

The background is created from distress Oxide ink pad with brayer and gel press, then sprinkled with mixtures from Ken Oliver's colourburst crystals (very much like brushos).  The dragons and castle are stamped with Versa fine claire ink pad (nocturne).

The border was cut from matte gold cardstock. I glued a piece of 8 x 10 dark grey cardstock onto a chipboard so it can be a sturdy backing for this scene to be displayed on the wall.

What fun I had creating this scene.  My background usually dictates the scene that comes to mind.  With this particular one, the cloud idea jumped out screaming for the castle to be stamped on top!


Thank you for stopping by.  Happy crafting............


Saturday, May 30, 2020

Finn Pondering at the Fairy Door

Finn pondering at the fairy door


This is my first DT project for Lavinia World challenge #28.  The large moon or sunset is the perfect backdrop for Finn pondering at the fairy door.  Hopefully this sets the stage to remind us that God is taking care of us, whether we know it or not!!

Lavinia stamps used:  Finn, Large fairy door, mini meadow mushroom
Metal dies used:  7-inch circle frame dies are from Paper Discovery,
the little frame die (stopper) is from Spellbinder      


The background was made from Distress Oxide ink pads and Ken Oliver's colourburst crystals.
The Fairy door was colored with colored pencils.  Silver linen paper was used for the circle frame.

This was a fun project.  I spent a better part of a good morning working on it.  May God bless the recipient of this card!